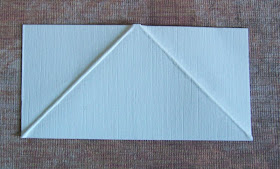
Just a quick blog to show how I made the bookmarks, this is not my idea but shows I how made them. The size of card is 10cm by 5cm and you simply bring the two corners across to the middle.

I stick one side to the shape I want to use.

I then cut out approx 7cm square and cut
diagonally across the middle to make two triangles, I only need one because I then do the same with a 6.5cm square to make layers in the pic. I then stick on the the bookmark triangle.

Decorate how you like, its brilliant for using scraps.

 Just a quick blog to show how I made the bookmarks, this is not my idea but shows I how made them. The size of card is 10cm by 5cm and you simply bring the two corners across to the middle.
 I stick one side to the shape I want to use.
 I then cut out approx 7cm square and cut diagonally across the middle to make two triangles, I only need one because I then do the same with a 6.5cm square to make layers in the pic. I then stick on the the bookmark triangle.
 Decorate how you like, its brilliant for using scraps.
Thanks for this Debby.
ReplyDeleteClare x
thanks for sharing that. I was going to ask how you made them. Thank you.
ReplyDeleteLove Karen x
Fab tutorial Debby. TFS.
ReplyDeletethanx for sharing with us,such a lovely gift idea ! xx jo xx
ReplyDeleteI am loving all these bookmarks they are fabulous!! Love the different shapes you've used :o)
ReplyDeletelotsalove
Amanda xx
this is brilliant Debby,
ReplyDeletethank you for sharing, i am definitly going to have a go at this. hugs racxhx
What a super idea, and the basic shape is so easy to do..... Thank you
ReplyDeletei can feel a million of these coming along LOL
Hugs mandi xx
Oh this is so fun Debby - will have to give it a go! Thank you for the mini tutorial!
ReplyDeleteHugs, Danielle
Brilliant idea Debby I will certainly be using this one, did you get my e-mail hun
ReplyDeleteHugs Jacqui x
Oh so clever, lovely idea, thanks for sharing. Kim
ReplyDeletethsnk you so much! i'll be trying this one out!
ReplyDeletehugs
daisy
such a neat idea for a bookmark! like this, thanks for sharing!
ReplyDeleteNicki
x
What a brilliant idea Debbie and you've used it perfectly. Love the way you've decorated them - quite beautiful
ReplyDeletex Michelle
Thank you for sharing your tutorial and also your wonderful bookmarks. An idea for class next week - a million thanks!!! :x
ReplyDeleteGreat idea, thanks for sharing.
ReplyDeleteB x
Hiya Debbie thanks for sharing this tutorial hun I learned a lot from it...thanks...hugs terry
ReplyDeleteWell that's stopped me wondering how they were made, thank you so much Debby, much appreciated :) Donna x
ReplyDeleteOoh, this looks so easy, I think I'll give it a go, thanks for the tips!
ReplyDeleteBeth xx
Great Idea Debby, and thanks for sharing your tutorial. Your bookmarks below are beautiful. Hugs Nikki x
ReplyDeletewhat a clever idea x
ReplyDeleteThese are great Debbie, thanks for the demo, think I might be making a few of these for my niece and nephew! Happy Crafting Sue xx
ReplyDeleteLove those bookmarks.
ReplyDeleteGreat job.
Greetings thea
Hi Debby
ReplyDeleteFantastic, huge thanks for sharing the tutorial.
Emma x
Hi Debby. These are brilliant. Will definitely be giving these a go. Thanks for sharing. Sue.x
ReplyDeleteGreat little bookmarks Debby! brilliant gift idea, maybe with a book token? Thanks for sharing them :)
ReplyDeleteHugs
Carol x
Beautiful card!
ReplyDeleteHugs,Willy
Thanks for sharing the instructions Debby. Here's what I've done! Hugs xx
ReplyDelete